The purpose of the database is to hold the data of Exchange Server. The database must be mounted on the server for the users to access their mailboxes and other data. But sometimes, the database gets dismounted due to various reasons and factors. In this article, we will be talking why a database gets dismounted from the Exchange Server. We will also be discussing various methods to mount a dismounted Exchange database.
Why a database gets dismounted
There could be many reasons why a database could be found as dismounted. Let’s talk about the common ones.
Licensing
This is one of the most common reasons. When it comes to licensing, Exchange Server has two types of licenses - Standard and Enterprise. The only difference between them is that the number of databases that can be mounted. In the Standard version, you can only have a limit of 5 active/mounted databases while in the Enterprise version, there is no limit. In the Standard version, if there are 5 databases online and you try to mount the new one, the database will not mount.
Unexpected Server Shutdown
The server might unexpectedly shutdown to prevent any damage/corruption to the database. In such a case, the database is dismounted before the shutdown. If the Exchange Server is not shut down smoothly, then this could also lead to corruption in the database.
Maintenance and Troubleshooting
Sometimes, when performing maintenance tasks, administrators need to dismount the database to prevent the users to do any changes to the database. This is also needed when troubleshooting specific issues with the server. This is also done to prevent any damage to the database.
Lack of Disk Space
When there is no disk space, you would need to dismount the database to prevent any damage to the database.
Upgrade and Patching
When installing Exchange Server updates, like Cumulative Updates (CU), you need to dismount the databases to safeguard the data integrity.
Methods to Mount the Dismounted Database
There are two methods to mount the database - using the Exchange Admin Center (EAC) or the Exchange Management Shell (EMS). Let’s explore both these methods.
Method 1: Using the Exchange Admin Center (EAC)
You can use the Exchange Admin Center (EAC) in the Exchange Server to mount the database. However, this allows you to mount only one database at a time. To mount the database using the EAC, follow these steps:
- Open the Exchange Admin Center (EAC) and login with the administrative account.
- Click on Servers from the left pane.
- Click on Databases on the main pane.
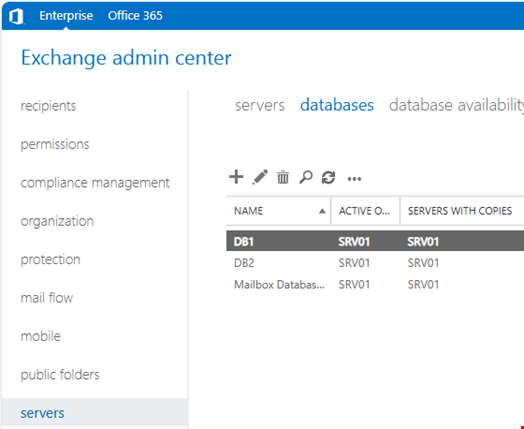
- Click on the database to mount.
- Click on the three dots and click on Mount.
After the operation is complete, check the databases pane to confirm that the database is mounted.
Method 2: Using the Exchange Management Shell (EMS)
You can use the PowerShell commands in Exchange Management Shell (EMS) to mount the database. You can create scripts to automate the process and other aspects of Exchange Server. Let’s see how to mount the database using the EMS.
Open the Exchange Management Shell (EMS).
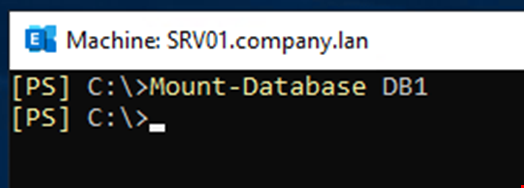
To mount the database, you need to run the Mount-Database command. However, to run this command, you need to have the right permissions. To get such permissions, you can run the below command.
Get-ManagementRoleEntry *\Mount-Database*

Now, you can assign the role to the user who will be doing this operation. For this, first you need to create the role group that only have the databases role.
New-RoleGroup "Mount Group" -Roles "Databases"

Then, you need to assign the role group to the user (see the below example).
Add-RoleGroupMember "Mount Group" -Member Administrator

This can be confirmed by using the Get-ManagementRoleAssignment command (see the below example).

Once the above permissions are set, you can proceed with the mounting of the database by using the Mount-Database command (see the below example).
Mount-Database <database name>
What if the database fails to mount?
If the database fails to mount, you need to analyze the error that might have occurred. You should also check the Event Viewer on the Exchange Server as this could indicate what is causing the issue. In addition, confirm the following:
- Third-party applications are not locking any files of the database. This could be an antivirus application or backup application.
- The user account have the right permissions to execute the command.
If the problem is not resolved, it means that there is corruption in the database or its files.
What if the database is corrupted?
If there is corruption in the database, you need to ensure that the services and data are restored in the least possible time and with no data loss. You can restore the database from backup but this would definitely result in data loss as you need to restore from the last healthy backup. The other option is to use the in-built tool, called ESEUtil, to perform soft recovery for minimal corruption. However, the success rate is not guaranteed and it would take some time to finish, depending on the database size and server’s performance.
If soft recovery fails, you can try the hard recovery option of ESEUtil. But same as the soft recovery, the success rate is not guaranteed and there are chances of data loss as this operation purges anything which is deemed as corrupt.
To overcome these challenges and quickly recover from disaster situations, you can use third-party Exchange recovery tool, such as Stellar Repair for Exchange. With this tool, you can open multiple databases, from any version of Exchange Server, of any size, and in any state. You will be able to browse through the interface which is very easy and granularly export user mailboxes, user archives, disabled mailboxes, shared mailboxes, public folders, and even purged and deleted items, to PST and other formats. You can also export the data directly to a live Exchange Server database or even to another Exchange Server. The tool offers features, such as automatic mailbox matching from source to destination, parallel export for performance, and priority exports for exporting VIP users on priority.